Place the
handle in the palm of the hand. It should not go in the middle of the
palm, but down a little in the meat area of the palm. The pinky should
wrap around the handle with the tip of the pinky resting on the bottom
flat of the handle. To help demonstrate the placement, begin by placing
the handle in the hand, leaving the hand mostly open. Place the handle in
the lower part of the palm, and wrap the pinky around the handle, but hold
the tool with nothing but the pinky. Position the handle in the pinky grip
so that the point comes out between and near the index finger and thumb.
Next, grasp the graver at the point with the index finger and thumb. The
tip of the ring finger should ride on the bottom side the AirGraver right
next to the handle.
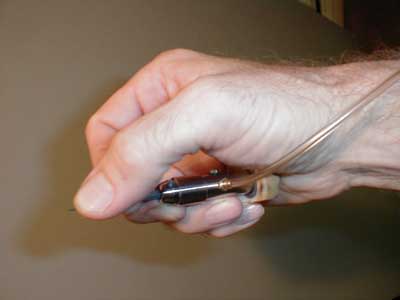
Side view of grip.
The PalmControl AirGraver is held the same as the foot pedal AirGraver.
Run the tubing up over the wrist as shown above to keep it out of the
vise.
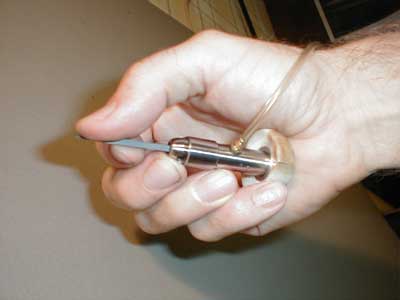
Bottom view of grip
Placing the graver down to the work
 When
placing the point down to the work,
there are two choices. One is to first place both the thumb and index
finger down and then slowly place the point down on the work. This
provides a steady tripod rest. The other choice is to only place the thumb
down and use it alone to steady the hand and to set the graver's point
where wanted. It is helpful to let the thumb stay on the engraving
surface. Let it drag along. If using the index finger on the surface too,
it may also be used to drag along the surface. The main reason for
dragging the thumb and/or index finger is to help catch the hand if the
graver begins to come up out of the cut when not expected. This is
particularly helpful for beginners.
When
placing the point down to the work,
there are two choices. One is to first place both the thumb and index
finger down and then slowly place the point down on the work. This
provides a steady tripod rest. The other choice is to only place the thumb
down and use it alone to steady the hand and to set the graver's point
where wanted. It is helpful to let the thumb stay on the engraving
surface. Let it drag along. If using the index finger on the surface too,
it may also be used to drag along the surface. The main reason for
dragging the thumb and/or index finger is to help catch the hand if the
graver begins to come up out of the cut when not expected. This is
particularly helpful for beginners.
Starting the cut
With the
point resting on the surface of the practice plate, feel for the best
angle of attack. To discover this, push the graver by hand with an angle
of attack that is too low. With a low angle, the graver will just slide
over the surface on the back of the heel of the point. As it is sliding,
slowly raise the angle until the point begins to dig in. This angle is the
correct angle to begin a cut. This angle is the same as the ground heel
angle. Next, move the point back to where the cut is to be started, and
use the angle that was just determined. For the PalmControl, the tool will
automatically begin softly impacting when the angle of attack is attained.
For foot pedal engraving, slowly press on the foot pedal. At the beginning
of a cut, a higher angle of attack is needed to dive to the depth desired.
When this depth is reached, level the angle of attack out to maintain this
depth.
If right
handed, place the left hand on the base of the vise. Use it to steady and
turn the vise. Warning: Beginners sometimes place their left hand
on the practice plate, using it to steady and turn the vise. Do not rest
the left hand on top of the vise! If the left hand is on the practice
plate in front of the graver, the point could skip out of the cut and
puncture the left hand very deeply. So, keep that hand down on the base of
the vise!
The three most useful techniques for beginners
1: Angle of
attack (keeping balance). The angle of attack is the key to keeping the
graver in a cut at a certain depth. The angle of attack is similar to
learning to maintain your balance when riding a bike. Move the handle of
the graver up to go deeper (steeper angle of attack), and move the handle
down (less steep) to go shallower or come out of the cut. To hold a
continuous depth (and width) of cut, the angle of attack is slightly
modified continually similar to the way one continuously and unconsciously
moves the bicycle handle bars to keep balance. With a few hours of
practice, most people can pick this up. With more practice, it becomes
second nature.
2: With
foot pedal engraving, getting the hang of using the throttle pedal to vary
the speed will need to be learned. Learn to NOT hold back when slowing
down. Maintain constant pressure holding the graver in the cut, and
control the cutting power with the pedal. The point will chatter around in
the cut if the engraver holds back.To slow down or stop, let up on the
foot pedal. With the PalmControl AirGraver, this problem is taken care of
and is more intuitive. Engraving with the PalmControl is analogous to
scooping out ice-cream with a spoon. If you want to go deeper, hold the
spoon up steeper and push it in harder. If you want to come out of the
ice-cream, lower the spoon angle of attack, and use less and less push
pressure as it comes up closer to the surface. The PalmControl takes care
of the impacting power automatically for the depth of cut being taken, so
that one may concentrate on what the hand is doing rather than also having
to think about what the foot is doing.
3: With
foot pedal engraving, you must learn to not push the graver point down too
hard, or push forward too hard. Too much of either will raise a burr on
the sides of the cut, and generally the cut will not be as clean. Let the
impacts do the work.
The
following description is not the proper way to engrave, but it may be
useful to help think through why pushing hard is not necessary. Hold the
tool with only the thumb and index finger on the handle. Rest the point
against the practice plate at the angle of attack that it will just begin
digging in. Press on the foot control slowly. Right away, starting moving
the handle up and down to find the balance to get to (and stay at) the
depth desired. Only push forward enough to hold the point of the graver in
the cut, and no more. To slow down, let up on the pedal, but do not hold
the graver point back. To come out of the cut, change the angle of attack
to a lesser angle. Holding the tool with only two fingers will make it
impossible to push down on the point. It will be possible to push forward,
which is necessary to a small degree to keep the point in the cut. The
mistake of pushing down or causing an excessive forward push is what will
cause the worst kind of raised burr along one or both sides of the cut. In
addition, much tool control is lost with excessive pushing.
That said,
there is a certain amount of forward pressure required to hold the graver
in a cut. This pressure is relative to the depth of cut, and it is this
forward pressure that the PalmControl AirGraver uses to work automatically.
A shading cut with delicate impacting will not require much
pressure to keep the graver snug in the cut., In a deeper cut, however,
the impacting is more severe, and in order to keep the recoil of the
impacts within the cut, more pressure is required. The idea
is to keep the graver snug in the cut so that the impacts can do their
work. But again, any more pressure than what is required to hold the
graver snug in a cut can result in a raised burr along the side of the
cut, and less control of the tool. The PalmControl prevents one from using
too much or too little pressure, and therefore helps teach the amount of
pressure to use, since it uses this pressure curve for operation.

.png)